File:Lisa Install 6.png and How to emulate the Apple Lisa: Difference between pages
No edit summary |
(WIP) |
||
| Line 1: | Line 1: | ||
In this article we will be describing '''how to emulate the Apple Lisa''' from 1983. The [https://en.wikipedia.org/wiki/Apple_Lisa Lisa] was one of the first PCs to include a GUI and was extremely influential for Apple's history. For this tutorial, we'll be using '''LisaEM''', a free open-source emulator that emulates the original Apple Lisa. You can run the original Lisa Office System OS as well as every Mac OS version up to System 6 using MacWorks XL. |
|||
==Installation== |
|||
===Pre-installation=== |
|||
Download the emulator from [https://lisa.sunder.net/downloads.html Sunder]. The latest version, as of this writing, is 1.2.7 Release Candidate 4. However, I had issues with 1.2.7 so I recommend using 1.2.6 instead. Both come with installers for modern Windows and macOS. |
|||
We will also want to download the OS itself. You can download the last version of the Lisa Office System from MEGA [https://mega.nz/file/dB9niAhL#psTMJAw8qCKgjlZlgnUQH6p3NUbEYJ3AxFX_PY8Qi0w here]. Extract the .rar somewhere on your system. You can also download Version 2 from [https://macintoshgarden.org/apps/lisa-office-system-20 Macintosh Garden], however it seems to have some issues running in this emulator, so I recommend using Version 3. |
|||
If you are using a version before 1.2.0 (why?) you will also have to provide your own boot ROMs. Versions after that can boot without one. |
|||
===Running the emulator=== |
|||
Next we will start the program. If you're running a version after 1.2.0, you don't need any ROMs. You should see something like this (photo downsized, click on it for a full screenshot): |
|||
[[File:LisaEM.png|400px]] |
|||
What's cool is that you interact with the PC by clicking on either the floppy drive or the power button. For now, click on the floppy disk on the right side (highlighted) and locate the extracted <code>Lisa Office System (1984)(Apple)(Disk 1 of 5).image</code> file. (You can also click File -> Insert Diskette). Note: On 1.2.6, you may have to click on the menu that says "<code>Disk Copy (*.dc42)</code>" and select "<code>All (*.*)</code>". |
|||
[[File:LisaEM Floppy.png]] |
|||
[[File:LisaEM Floppy 2.png]] |
|||
You'll see an animation play which means the disk has been inserted. Click on the white power button below the main screen, or click on Key -> Power Button. |
|||
[[File:LisaEM Power.png]] |
|||
A window will come up asking you which device the Lisa should boot from. Select "Floppy Diskette" and hit OK. |
|||
[[File:LisaEM Diskette.png]] |
|||
Another window will come up asking what hard drive size you want to use. For this, I highly recommend using 10 MB, but you can go up to 40 MB using MacWorks. |
|||
[[File:LisaEM Hard Drive.png]] |
|||
===Installation=== |
|||
If all goes well, you should boot into a screen with a giant floppy disk. Give the system a few seconds to a minute (depending on your host system speed) to start up. |
|||
[[File:Lisa Floppy Boot.png|400px]] |
|||
Now you'll drop into the installation screen. This installation screen actually functions a lot like a modern installation wizard so it's pretty simple to use. Simply move your mouse button over to the Install button. |
|||
[[File:Lisa Install 1.png|400px]] |
|||
The installer will ask if you want to use the attached parallel drive. We do want to use it, so click OK. |
|||
[[File:Lisa Install 2.png|400px]] |
|||
On this screen, it will state that the disk has either been damaged or is not initialized. Obviously, the disk is not damaged and simply hasn't been initialized, so we'll want to click Continue. This will format the virtual drive. |
|||
[[File:Lisa Install 3.png|400px]] |
|||
Here, it will ask you if you want to share the disk with MacWorks. If you plan on installing and using MacWorks with this, choose "Share". Otherwise, choose "Don't Share". I am not going to be using MacWorks, so I chose "Don't Share". |
|||
[[File:Lisa Install 4.png|400px]] |
|||
Now the OS will erase and initialize the disk. This process will take several minutes to finish, so just sit back and watch some YouTube videos or something while you wait for it to finish up. |
|||
[[File:Lisa Install 5.png|400px]] |
|||
After a while, it will ask you to insert the Lisa Office System 2 diskette. Click on the floppy drive again or click File -> Insert Diskette and locate the <code>Lisa Office System (1984)(Apple)(Disk 2 of 5).image</code> file. A message box might come up asking you to De-Serialize the disk. Hit "Yes" and click Continue in the setup wizard. Repeat this step for the following disk images. |
|||
[[File:Lisa Install 6.png|400px]] |
|||
[[Category:Tutorials]] |
|||
Revision as of 02:26, 4 April 2023
In this article we will be describing how to emulate the Apple Lisa from 1983. The Lisa was one of the first PCs to include a GUI and was extremely influential for Apple's history. For this tutorial, we'll be using LisaEM, a free open-source emulator that emulates the original Apple Lisa. You can run the original Lisa Office System OS as well as every Mac OS version up to System 6 using MacWorks XL.
Installation
Pre-installation
Download the emulator from Sunder. The latest version, as of this writing, is 1.2.7 Release Candidate 4. However, I had issues with 1.2.7 so I recommend using 1.2.6 instead. Both come with installers for modern Windows and macOS.
We will also want to download the OS itself. You can download the last version of the Lisa Office System from MEGA here. Extract the .rar somewhere on your system. You can also download Version 2 from Macintosh Garden, however it seems to have some issues running in this emulator, so I recommend using Version 3.
If you are using a version before 1.2.0 (why?) you will also have to provide your own boot ROMs. Versions after that can boot without one.
Running the emulator
Next we will start the program. If you're running a version after 1.2.0, you don't need any ROMs. You should see something like this (photo downsized, click on it for a full screenshot):

What's cool is that you interact with the PC by clicking on either the floppy drive or the power button. For now, click on the floppy disk on the right side (highlighted) and locate the extracted Lisa Office System (1984)(Apple)(Disk 1 of 5).image file. (You can also click File -> Insert Diskette). Note: On 1.2.6, you may have to click on the menu that says "Disk Copy (*.dc42)" and select "All (*.*)".


You'll see an animation play which means the disk has been inserted. Click on the white power button below the main screen, or click on Key -> Power Button.

A window will come up asking you which device the Lisa should boot from. Select "Floppy Diskette" and hit OK.

Another window will come up asking what hard drive size you want to use. For this, I highly recommend using 10 MB, but you can go up to 40 MB using MacWorks.

Installation
If all goes well, you should boot into a screen with a giant floppy disk. Give the system a few seconds to a minute (depending on your host system speed) to start up.

Now you'll drop into the installation screen. This installation screen actually functions a lot like a modern installation wizard so it's pretty simple to use. Simply move your mouse button over to the Install button.

The installer will ask if you want to use the attached parallel drive. We do want to use it, so click OK.

On this screen, it will state that the disk has either been damaged or is not initialized. Obviously, the disk is not damaged and simply hasn't been initialized, so we'll want to click Continue. This will format the virtual drive.

Here, it will ask you if you want to share the disk with MacWorks. If you plan on installing and using MacWorks with this, choose "Share". Otherwise, choose "Don't Share". I am not going to be using MacWorks, so I chose "Don't Share".

Now the OS will erase and initialize the disk. This process will take several minutes to finish, so just sit back and watch some YouTube videos or something while you wait for it to finish up.

After a while, it will ask you to insert the Lisa Office System 2 diskette. Click on the floppy drive again or click File -> Insert Diskette and locate the Lisa Office System (1984)(Apple)(Disk 2 of 5).image file. A message box might come up asking you to De-Serialize the disk. Hit "Yes" and click Continue in the setup wizard. Repeat this step for the following disk images.

File history
Click on a date/time to view the file as it appeared at that time.
| Date/Time | Thumbnail | Dimensions | User | Comment | |
|---|---|---|---|---|---|
| current | 02:20, 4 April 2023 | 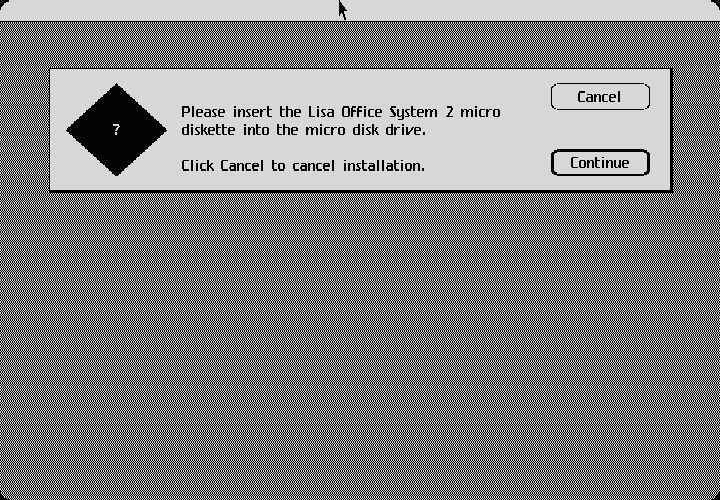 | 720 × 500 (4 KB) | Dartz (talk | contribs) |
You cannot overwrite this file.
File usage
The following page uses this file: