Running your own Wii Forecast Channel: Difference between revisions
No edit summary |
No edit summary |
||
| (2 intermediate revisions by 2 users not shown) | |||
| Line 3: | Line 3: | ||
The '''Wii Forecast Channel''' was a channel available to WiiConnect24 users. It launched in November of 2006 and closed in 2013. |
The '''Wii Forecast Channel''' was a channel available to WiiConnect24 users. It launched in November of 2006 and closed in 2013. |
||
With services like RiiConnect24 and WiiLink, you can revive this channel and use it just like before, but if you're a nerd like me and want to add your own locations, you'll need to do some hacking. Fortunately it's pretty easy so long as |
With services like RiiConnect24 and WiiLink, you can revive this channel and use it just like before, but if you're a nerd like me and want to add your own locations, you'll need to do some hacking. Fortunately it's pretty easy so long as you're a little tech savvy. |
||
==What do we need?== |
== What do we need? == |
||
You will need: |
You will need: |
||
*Sharpii |
* Sharpii |
||
*Some sort of hex editor |
* Some sort of hex editor |
||
*A web server that can serve files |
* A web server that can serve files |
||
*The latest dev build of the Dolphin emulator or a WAD installer if you're on an actual Wii |
* The latest dev build of the Dolphin emulator or a WAD installer if you're on an actual Wii |
||
==Patching the WAD== |
== Patching the WAD == |
||
Get the latest release of Sharpii here: https://github.com/mogzol/sharpii/releases and extract it somewhere. |
Get the latest release of Sharpii here: https://github.com/mogzol/sharpii/releases and extract it somewhere. |
||
| Line 25: | Line 25: | ||
[[File:WiiForecast Tutorial 1.png|700px]] |
[[File:WiiForecast Tutorial 1.png|700px]] |
||
We need to replace this with our web server. It can be any URL - an IP, a website, etc |
We need to replace this with our web server. It can be any URL - an IP, a website, etc. I replaced the url with <code>http://computernewb.com/pad/</code>: |
||
[[File:WiiForecast Tutorial 2.png|700px]] |
[[File:WiiForecast Tutorial 2.png|700px]] |
||
Thankfully the Forecast Channel doesn't mind if it's been tampered with, so we don't have to do any additional modification. |
|||
Save the file and close the hex editor. Repack the WAD using Sharpii: |
Save the file and close the hex editor. Repack the WAD using Sharpii: |
||
| Line 37: | Line 39: | ||
To install the System Menu go to Tools -> Perform System Online Update -> Current Region. |
To install the System Menu go to Tools -> Perform System Online Update -> Current Region. |
||
==Generating the files== |
== Generating the files == |
||
Ok, now that we've patched the WAD we now need to get some files to actually serve the Forecast Channel. The easiest tool I've found for this is WiiLink's [https://github.com/WiiLink24/ForecastChannel ForecastChannel] generator. It requires Go and an Accuweather API key. So first thing is to download Go and add it to your PATH. Then clone the repository and run the following command: |
Ok, now that we've patched the WAD, we now need to get some files to actually serve the Forecast Channel. The easiest tool I've found for this is WiiLink's [https://github.com/WiiLink24/ForecastChannel ForecastChannel] generator. It requires Go and an Accuweather API key. So the first thing is to download Go and add it to your PATH. Then clone the repository and run the following command: |
||
<code>go mod download</code> |
<code>go mod download</code> |
||
| Line 76: | Line 78: | ||
...and then copy your respective <code><country></code> tag from the backed up file, as well as the <code><international></code> and <code><conditions></code> tags. This will GREATLY speed up the process and will reduce the amount of API calls you use. |
...and then copy your respective <code><country></code> tag from the backed up file, as well as the <code><international></code> and <code><conditions></code> tags. This will GREATLY speed up the process and will reduce the amount of API calls you use. |
||
To add a location |
To add a location, it's pretty easy. Just copy and paste the <code><city></code> tag and fill out the information. If you put it in the international category, you won't be able to get the UV index or 5-day forecast for the location due to a limitation in the software. |
||
Example of adding the |
Example of adding the South Pole in Antarctica: |
||
<syntaxhighlight lang="xml"> |
<syntaxhighlight lang="xml"> |
||
<international> |
<international> |
||
Latest revision as of 18:25, 18 January 2024

The Wii Forecast Channel was a channel available to WiiConnect24 users. It launched in November of 2006 and closed in 2013.
With services like RiiConnect24 and WiiLink, you can revive this channel and use it just like before, but if you're a nerd like me and want to add your own locations, you'll need to do some hacking. Fortunately it's pretty easy so long as you're a little tech savvy.
What do we need?
You will need:
- Sharpii
- Some sort of hex editor
- A web server that can serve files
- The latest dev build of the Dolphin emulator or a WAD installer if you're on an actual Wii
Patching the WAD
Get the latest release of Sharpii here: https://github.com/mogzol/sharpii/releases and extract it somewhere.
Get v7.0 of the Forecast Channel from Vimm's Lair: https://vimm.net/vault/35825 for the US version or https://vimm.net/vault/35820 for the European version. Put the WAD in the same folder as Sharpii. Open cmd or a Linux terminal, cd to the folder with Sharpii, and type the following command:
sharpii wad -u "Forecast Channel (USA) (v7) (Channel).wad" unpacked/
If all was successful you should have a folder named unpacked with a bunch of .app files. We want to specifically open 00000001.app with a hex editor.
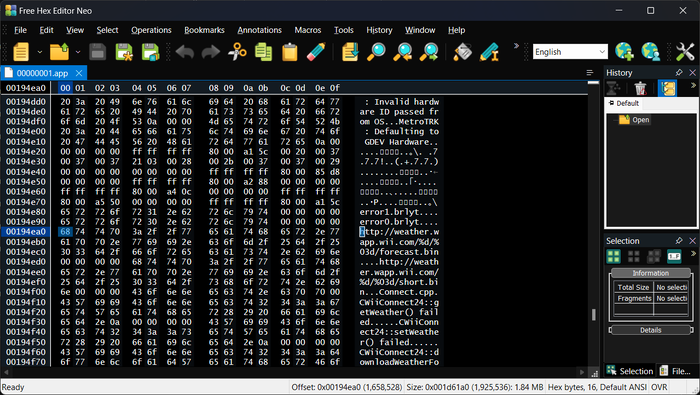
Go to offset 0x00194ea0 (or do a search for http://weather.wapp.wii.com) and you should see the URL.
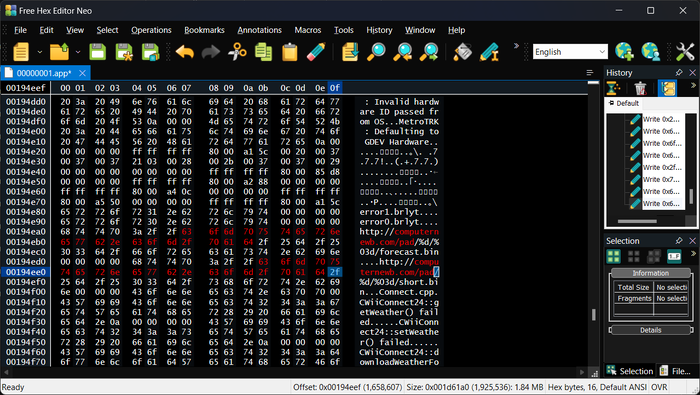
We need to replace this with our web server. It can be any URL - an IP, a website, etc. I replaced the url with http://computernewb.com/pad/:
Thankfully the Forecast Channel doesn't mind if it's been tampered with, so we don't have to do any additional modification.
Save the file and close the hex editor. Repack the WAD using Sharpii:
sharpii.exe wad -p unpacked\ Patched.wad
The WAD should now be patched. To install it in Dolphin, open Dolphin and click Tools -> Install WAD... and locate the file. Before doing that, make sure you have Wii System Menu installed, because we'll need it to actually use the Forecast Channel. (If you install the WAD before installing the System Menu, you'll have to install it again because the System Menu update will overwrite the Forecast Channel files.)
To install the System Menu go to Tools -> Perform System Online Update -> Current Region.
Generating the files
Ok, now that we've patched the WAD, we now need to get some files to actually serve the Forecast Channel. The easiest tool I've found for this is WiiLink's ForecastChannel generator. It requires Go and an Accuweather API key. So the first thing is to download Go and add it to your PATH. Then clone the repository and run the following command:
go mod download
Then we'll need to edit accuweather\requests.go and add our API key. You can either generate one on AccuWeather's website or *wink* *nudge* find one on Google.
We'll need to generate a certificate for the Forecast Channel's files, so just go to the root ForecastChannel folder and generate the certificate using openssl (you'll need to install it on Windows): openssl genrsa -traditional -out Private.pem 2048
Now for the more annoying part of this project... By default it has a HUGE weather.xml file with a ton of different countries that you very likely don't need. My advice is, backup the file, wipe out the original and replace it with an empty-ish version like this...
<root xmlns:xsi="http://www.w3.org/2001/XMLSchema-instance" xmlns:xsd="http://www.w3.org/2001/XMLSchema">
  <country>
    <name jpn="アメリカ" eng="United States" de="Vereinigte Staaten" fr="Etats-Unis d’Amérique" es="Estados Unidos de América" it="Stati Uniti d'America" nl="Verenigde Staten" />
    <city jpn="ワシントンD.C." eng="Washington D.C." de="Washington, D.C." fr="Washington" es="Washington D. C." it="Washington" nl="Washington D.C.">
      <province jpn="コロンビア特別区" eng="District of Columbia" de="District of Columbia" fr="District Fédéral de Washington D.C." es="Distrito de Columbia" it="Distretto di Columbia" nl="District of Columbia" />
      <longitude>-77.0361328125</longitude>
      <latitude>38.8916015625</latitude>
      <zoom1>8</zoom1>
      <zoom2>3</zoom2>
    </city>
  </country>
  <international>
    <city>
      <province jpn="東京都" eng="Tokyo" de="Tokio" fr="Tokyo" es="Tokio" it="Tokyo" nl="Tokio" />
      <longitude>139.7625732421875</longitude>
      <latitude>35.68359375</latitude>
      <zoom1>9</zoom1>
      <zoom2>3</zoom2>
      <country jpn="日本" eng="Japan" de="Japan" fr="Japon" es="Japón" it="Giappone" nl="Japan" />
      <name jpn="東京" eng="Tokyo" de="Tokio" fr="Tokyo" es="Tokio" it="Tokyo" nl="Tokio" />
    </city>
etc etc...
...and then copy your respective <country> tag from the backed up file, as well as the <international> and <conditions> tags. This will GREATLY speed up the process and will reduce the amount of API calls you use.
To add a location, it's pretty easy. Just copy and paste the <city> tag and fill out the information. If you put it in the international category, you won't be able to get the UV index or 5-day forecast for the location due to a limitation in the software.
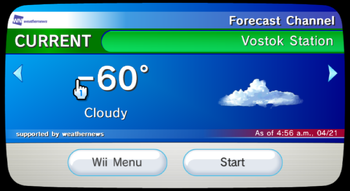
Example of adding the South Pole in Antarctica:
  <international>
    <city>
      <province jpn="" eng="" de="" fr="" es="" it="" nl="" />
      <longitude>0.0000</longitude>
      <latitude>-90.0000</latitude>
      <zoom1>9</zoom1>
      <zoom2>3</zoom2>
      <country jpn="" eng="Antarctica" de="" fr="" es="" it="" nl="" />
      <name jpn="" eng="The South Pole" de="" fr="" es="" it="" nl="" />
    </city>
  </international>
Bit of a breakdown of the above:
<province jpn="" eng="" de="" fr="" es="" it="" nl="" />
This is the province (or state, or what have you) that will display when you wait a few seconds on the weather information screen. So if you were doing Atlanta, Georgia, USA, you'd put "Georgia" in the eng attribute. The different attributes (jpn, de, fr, es, it, nl) are for Japanese, German, French, Spanish, Italian and Dutch localizations. Personally I always just leave those blank because I only use the English version, but if you're making your Forecast Channel public, I'd translate them just in case.
<longitude>0.0000</longitude>
The Longitude of the location. You can get this from Geonames, Google Maps, etc
<latitude>-90.0000</latitude>
The Latitude of the location. Again you can get this from Geonames, Google Maps, and other places
<zoom1>9</zoom1>
This is how much you will have to zoom out of the map before you stop seeing the location. 9 means its visible at all times, even if you're fully zoomed out. 0 means you have to be fully zoomed in to see it. For local locations, I recommend making it 0, but for really important international locations, 9 is good. If you don't know what zoom to make it 4 is usually a good compromise.
<zoom2>3</zoom2>
Honestly, I have no idea. It seems to be always set at "3" though so I just leave it.
<country jpn="" eng="Antarctica" de="" fr="" es="" it="" nl="" />
Pretty self explanatory. Name of the country which will show up in the forecast information.
<name jpn="" eng="The South Pole" de="" fr="" es="" it="" nl="" />
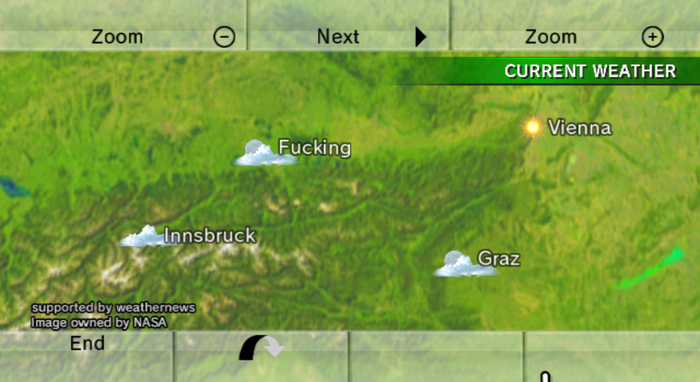
The name of the city. This is what will appear on the map.
When you've added the locations you want you can then generate the files like this:
go run .
and it will generate the files. It'll make a folder called files which will contain everything we need for the Forecast Channel to work. Put the contents of this folder wherever you pointed the Forecast Channel to be on your web server. Start Dolphin and if everything worked you should be given an option to choose your location.
If you get a FORE00006, something is wrong with the generated files (debugging this can be very tricky unfortunately; I had to remove a few custom locations I added that weren't working for some reason) or your Wii clock is set wrong. If you get an error like "WiiConnect24 cannot be used" then either your files are either 403ing or 404ing which is usually caused by a permissions issue (make sure they can be accessed through the web), or your Dolphin version is too old - make sure to use the latest dev build.
Enjoy!


