How to install Windows 11 on unsupported hardware: Difference between revisions
No edit summary |
No edit summary |
||
| Line 1: | Line 1: | ||
{{SeriousChangeNeeded}} |
{{SeriousChangeNeeded}} |
||
'''Windows 11''' is the latest and not so greatest version of Windows. Since launch, people have been complaining about its high system requirements |
'''Windows 11''' is the latest and not so greatest version of Windows. Since launch, people have been complaining about its high system requirements. In this tutorial, we'll be bypassing all of that stuff. |
||
== Before you start == |
== Before you start == |
||
Some things you should know: |
|||
=== Tiny lil things. === |
|||
* TPM 1.2 may be required, in this case, my PC has it. |
* TPM 1.2 may be required, in this case, my PC has it. |
||
* UEFI is not enforced. |
* UEFI is not enforced. (Atleast not yet) |
||
* The build we are using is 22000.318, which seems to be the current ISO you can download right now. |
* The build we are using is 22000.318, which seems to be the current ISO you can download right now. |
||
* You can |
* You ''can'' upgrade from Windows 7, you will need to do some changes to the install.esd (or wim), which we will not go into. Unsure about Windows 8. |
||
* '''There are risks to installing Windows 11 on unsupported hardware, Microsoft states you won't be eligible to get Windows updates. Although they seem to work.''' |
|||
=== Risks === |
|||
* Some big multiplayer games are requiring TPM 2 on Windows 11 such as VALORANT. If you play these games, I would think twice about upgrading. |
|||
* For iGPU users: Windows 11 22H2 introduces a new version of the WDDM, version 3.1. This drops support for iGPUs, so you will not get the pretty effects that Windows 11 has. |
|||
* Microsoft has announced in 08/21 that unsupported Windows 11 installations won't get updates, whether this is true or not I don't know. |
|||
* '''Future Windows 11 updates may limit the features that you can use, and even worse, possibly even brick your install.''' ''(In 23H2, there seems to be a bugcheck for UNSUPPORTED_PROCESSOR)'' |
|||
== What we need == |
== What we need == |
||
| Line 16: | Line 22: | ||
* [https://cdn.discordapp.com/attachments/972654791471824917/979485515894128710/appraiserres.dll The appraiserres.dll from Windows 10] |
* [https://cdn.discordapp.com/attachments/972654791471824917/979485515894128710/appraiserres.dll The appraiserres.dll from Windows 10] |
||
* [https://www.microsoft.com/en-us/software-download/windows11 A retail copy of Windows 11, make sure to download the ISO (not using the media creation tool)] |
* [https://www.microsoft.com/en-us/software-download/windows11 A retail copy of Windows 11, make sure to download the ISO (not using the media creation tool)] |
||
* A PC that supports the Windows 10 system requirements ( |
* A PC that supports the Windows 10 system requirements (It may work on older hardware, but it may run slowly.) |
||
* Proper braincells. Even a retard like myself could do this. |
|||
* A USB drive, I use a 64 GB one and it works perfectly. An 8 GB thumb drive can work, probably. |
* A USB drive, I use a 64 GB one and it works perfectly. An 8 GB thumb drive can work, probably. |
||
Revision as of 23:26, 29 August 2022
| Rewrite Needed This article requires a partial or full rewrite to meet the wiki's standards. |
Windows 11 is the latest and not so greatest version of Windows. Since launch, people have been complaining about its high system requirements. In this tutorial, we'll be bypassing all of that stuff.
Before you start
Some things you should know:
Tiny lil things.
- TPM 1.2 may be required, in this case, my PC has it.
- UEFI is not enforced. (Atleast not yet)
- The build we are using is 22000.318, which seems to be the current ISO you can download right now.
- You can upgrade from Windows 7, you will need to do some changes to the install.esd (or wim), which we will not go into. Unsure about Windows 8.
Risks
- Some big multiplayer games are requiring TPM 2 on Windows 11 such as VALORANT. If you play these games, I would think twice about upgrading.
- For iGPU users: Windows 11 22H2 introduces a new version of the WDDM, version 3.1. This drops support for iGPUs, so you will not get the pretty effects that Windows 11 has.
- Microsoft has announced in 08/21 that unsupported Windows 11 installations won't get updates, whether this is true or not I don't know.
- Future Windows 11 updates may limit the features that you can use, and even worse, possibly even brick your install. (In 23H2, there seems to be a bugcheck for UNSUPPORTED_PROCESSOR)
What we need
- The appraiserres.dll from Windows 10
- A retail copy of Windows 11, make sure to download the ISO (not using the media creation tool)
- A PC that supports the Windows 10 system requirements (It may work on older hardware, but it may run slowly.)
- A USB drive, I use a 64 GB one and it works perfectly. An 8 GB thumb drive can work, probably.
Step 1: Download the retail ISO
A retail copy of Windows 11 can be downloaded officially from Microsoft
Scroll down until you see the "Download Windows 11 Disk Image (ISO)" part, select the multi-edition one. Then select your language, in case of me, I selected "English (United States)", however you can choose any language you want.
There now should be a Confirm button, click that and you should get a Download button with this text:
Links valid for 24 hours from time of creation.
Links expire: 5/28/2022 10:15:51 PM UTC (time may vary)
Click the download button, and your download should begin.
Step 2: Flashing to USB (Optional, but recommended)
Plug in your USB drive to the computer. Open the downloaded ISO file with 7-zip, or whatever. Copy all of it's contents to the USB drive. After that's done, continue to the next step.
NOTE: If you don't have a USB drive, or have one that's not 8 GB, you can try copying the files to the system disk, although this failed with a setup error for me.
Step 3: Bypassing the Requirements
The file that checks for compatibility is appraiserres.dll, which you can replace with an appraiserres.dll from a Windows 10 image, You can grab one yourself, or download it here.
After that's done, go into the setup root, go into sources and drag the Windows 10 appraiserres.dll into there, if it asks you to replace, click Yes.
It's that easy.
Step 4: Installing

In this tutorial we are going to be upgrading. Make sure not to launch setup from the sources folder, as it won't allow you to upgrade. Instead, use the setup from the root.
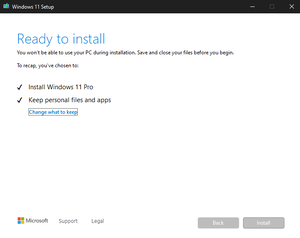
Make sure not to download updates, I don't know if that breaks stuff. Also don't make the installation better. Start clicking next until you see the "Ready to install" screen. Make sure you're ready to do this, and when you are, click Install.
It should take an hour or so, depends on your PC. It'll copy files, reboot, install updates (although it didnt update my version) and boot into Windows 11.
And you're done!

You just installed Windows 11 on your "unsupported" PC, Enjoy.
If you don't like it, go into Settings > Recovery > Go back. This option is only available for ten days, but there are other ways to extend it.