How to install Windows 98 in QEMU
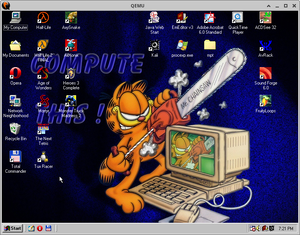
This page details how to install Windows 98 in QEMU. Windows 98 is an operating system created by Microsoft released in June 1998. There is an updated version dubbed Windows 98 Second Edition, which fixes some bugs and adds new features. Support ended in July 2006.
We strongly recommend Windows 98 Second Edition as it fixes many bugs from FE and has more application support. This tutorial will assume you're using SE (but should work on FE).
Currently, Windows 98 SE is running as VM4 on CollabVM, so if you want to take it for a spin without installing it on your computer, check that out.
Prerequisites
QEMU
You'll need QEMU installed.
Windows 98 QuickInstall
Windows 98 without any patches is very, very unstable under QEMU, with bugs such as hanging on reboot, hanging on DOS prompt, hanging randomly, you get the picture. For this reason, we'll be using the Windows 98 QuickInstall Project for this guide, which bundles multiple patches to greatly improve the stability under QEMU.
You can download it through one of the following options:
- Build it yourself
- Download from Computernewb ISOs (0.9.3)
- Download from archive.org (0.9.4) (This link also has other ISOs that contain extra software and utilities. Pick whichever you want, it's your choice.)
SoftGPU
We'll also be using the SoftGPU driver, to add 32-bit color and high-res support, and also to enable 3D acceleration. Grab the ISO from GitHub here.
Starting up
Installation
First, open a command window and create a disk image for the VM using a command like the following:
qemu-img create -f qcow2 win98.img 4G
4G can be replaced with however big or small you want the hard drive to be (with G standing for Gigabytes). Windows 98 is a very old OS and does not take up a lot of space.
When that's done, start up QEMU with a command like the following:
qemu-system-i386 -hda win98.img -cdrom win98_iso_name.iso -device VGA,vgamem_mb=64 -cpu host -m 256 -accel kvm -M pc-i440fx-2.4,hpet=off -netdev user,id=lan -device pcnet,netdev=lan -usb -device usb-mouse -rtc base=localtime -monitor stdio
If you intend to use this with the USB tablet, replace -device usb-mouse with -device usb-tablet.
For audio add -device AC97 to the parameters and use the ac97_362.zip driver. This driver also provides as an additional bonus some pretty respectable Sound Blaster Pro 2.0 PCM emulation out of the box which is compatible and fully functional on QEMU.
The machine argument is set to pc-i440fx-2.4 for compatibility sakes, and the -device VGA,vgamem_mb=64 parameter allocates 64MB of VRAM onto the generic VGA adapter QEMU provides to allow higher resolutions and color depths within 98SE.
We set the memory to 256 MB, but it can run on as low as 16 MB of RAM, although this isn't recommended as the SoftGPU driver requires extra memory in order to be able to allocate textures in games.
Press any key except F8 to boot into the Windows 98 Quick Installer. The installation here is pretty self explanatory. If you used the "all" iso, you'll be prompted to select a Windows version. We recommend 98 SE. Proceed to format a single FAT32 partition taking up all of available space and mark it as bootable, make sure to write changes to the disk and exit. Once prompted to install integrated device drivers, select Yes and continue. By any circumstances do NOT select slow PnP detection as this will hinder the installation process, let it install and reboot.
At this point if all went well, Windows should reboot, install drivers, and load the desktop. If you get a bluescreen or protection error, refer to the troubleshooting section. If it all worked, keep reading
Enabling DMA
The first thing you'll want to do is enable DMA on your hard disk ASAP, as it is not enabled by default and this can cause major instabilities.
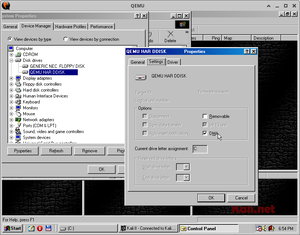
- Open Control Panel from the Start Menu
- Select "System" and switch to the Device Manager tab
- Expand "Disk Drives" and double click "QEMU Hard Disk"
- Switch to the "Settings" tab and tick "DMA"
- Reboot Windows
Display driver installation
After the first boot, you will notice that the display is small and very low quality. This is because, without drivers, Windows 98 runs in 16-color mode, fixed to 640x480 resolution.
This is where -cpu host comes into play, as SoftGPU provides SSE3 optimized binaries by default for in this case, software accelerated 3D rendering. Although you could compile yourself SSE4.2 binaries if you wished to do so. Now yes, you could use this with -cpu pentium3 but do keep in mind MMX optimized binaries are very slow as the maximum performance you can reach with those is around 5 to 10 FPS if you are lucky and may or may not have tons of bugs that just don't make them worth using.
We will now install the SoftGPU driver to enable higher resolutions and 32-bit color support.
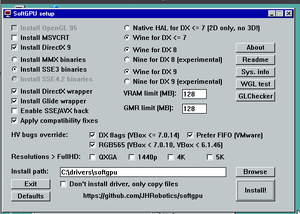
- Switch to the SoftGPU ISO by running a command similar to the following in the QEMU console:
change ide1-cd0 softgpu-<version>.iso
- If the installer does not run on its own, double click the CD in My Computer
- The SoftGPU installer will now open. You can pretty much accept the defaults here, however you may want to consider selecting Mesa3D Gallium "Nine" instead of Wine(D3D) for DX8 and DX9 for improved performance at a slight potential stability cost.
- Click Install. After a minute or two, you will be prompted to reboot. Click Yes.
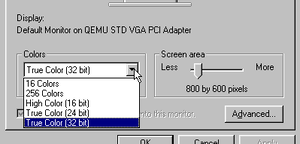
- Once Windows reboots, right click the desktop, select properties, and switch to the "Settings" tab
- If all went well, you should now be able to set the resolution to 1024x768.
You may encounter a bug where not all color modes are available, and attempting to increase to one that is or change the resolution does not properly apply. Refer to the troubleshooting section for how to fix this.
Finishing up
Congratulations, you should now have a functioning Windows 98 install! Here is some recommended software to install:
- Internet Explorer 6 SP1 (This is also bundled on the Win98 QuickInstall CD replace X with corresponding CD drive letter: X:\extras\IE6Sp1)
- Opera 10.63
Troubleshooting
VXD or protection errors on first boot
Upon rebooting from the quick installer into Windows 98, you may get a blue screen and error related to "VxD", or "Windows protection". This is usually caused by Windows 98 not being compatible with one or more features of your CPU. To solve this, change -cpu host in your QEMU startup command to -cpu core2duo or if you're on an AMD CPU use -cpu Opteron_G2 and restart the installation. Windows should now install without issues.
Cannot change color depth or resolution after installing SoftGPU
After installing SoftGPU, you may find that you are unable to change the color depth or resolution, with Windows prompting for reboot and then resetting back to 16 colors, 640x480 afterward. Additionally, you may notice that all color depths are not visible in the settings menu.
This is usually caused by Windows failing to install an adequate monitor driver. To solve this, you'll want to do the following:
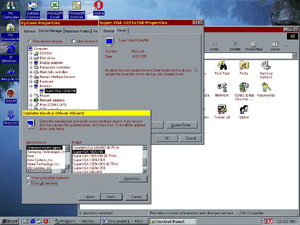
- Open Control Panel from the Start Menu and select System
- Switch to the Device Manager tab
- Expand "Monitors" and double click the monitor
- Switch to the "Driver" tab and select update driver.
- Select to show all drivers on the computer, and then all hardware.
- Select the "Standard Monitor Types" tab
- Install either the "Super VGA (any maximum resolution you'd like here)" or "Plug-and-Play Monitor" driver. Both have been reported to work for different people so if one doesn't, try the other
- Re-insert the SoftGPU CD if you removed it and reinstall SoftGPU. Agree when it asks to reboot
- You should now be able to use 32-bit color and higher resolutions
Problems in some 2D games
If you have installed SoftGPU with Wine <= DX7 setting, you might run across graphical issues and other things related to the game not being compatible with the WineD3D DirectDraw implementation, most notably being unable to Alt-Tab from the game and such things in some games misbehaving with the Wine renderer.
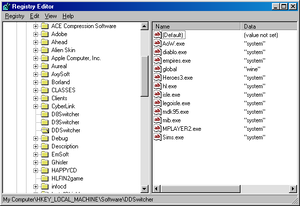
The following is the solution on how to resolve the problem:
- Open the Registry Editor (regedit) through Run
- Navigate to the following registry key: HKEY_LOCAL_MACHINE\Software\DDSwitcher
- Make new String value titled the game's executable name for example: Heroes3.exe for Heroes of Might and Magic 3
- The key's value should be set to "system" without quotes to fallback to the standard DirectDraw DLL.
- The problem should be resolved.