QEMU/Guests/Windows 11: Difference between revisions
m (Elijahr241 moved page How to install Windows 11 in QEMU to QEMU/Guests/Windows 11) |
Undefishin (talk | contribs) No edit summary |
||
| Line 1: | Line 1: | ||
'''[[How_to_install_Windows_10_in_QEMU|< Windows 10]]''' | '''''[[How_to_install_Windows_in_QEMU|<<< Table of Contents]]''''' |
'''[[How_to_install_Windows_10_in_QEMU|< Windows 10]]''' | '''''[[How_to_install_Windows_in_QEMU|<<< Table of Contents]]''''' |
||
{{DISPLAYTITLE:How to install Windows 11 in QEMU}} |
|||
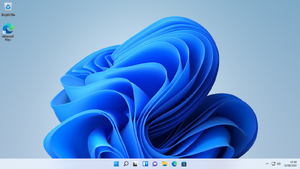
[[File:11Desktop.png|thumb|The Windows 11 desktop in build 22000.348]] |
[[File:11Desktop.png|thumb|The Windows 11 desktop in build 22000.348]] |
||
'''Windows 11''' is an operating system created by Microsoft which was officially released on October 5, 2021. The first build of Windows 11 (Build 21996) was leaked sometime in June 2021. It is the latest version of Windows. |
'''Windows 11''' is an operating system created by Microsoft which was officially released on October 5, 2021. The first build of Windows 11 (Build 21996) was leaked sometime in June 2021. It is the latest version of Windows. |
||
Revision as of 10:55, 27 July 2022
< Windows 10 | <<< Table of Contents

Windows 11 is an operating system created by Microsoft which was officially released on October 5, 2021. The first build of Windows 11 (Build 21996) was leaked sometime in June 2021. It is the latest version of Windows.
Running on CollabVM
Windows 11 works alright, but can be somewhat slow on QEMU even with KVM turned on. Disabling and uninstalling unnecessary background applications helps fix this problem. VM6 currently runs the 22000.556 build of Windows 11.
Windows 11 is exceedingly slow without virtualization, so if you don't have root/KVM/Xen, speeds are not optimal.
Recommended version if you meet the requirements: Latest version (Pro)
Recommended version for if you don't meet the requirements: Version 22000.184 (Pro)
Before you begin

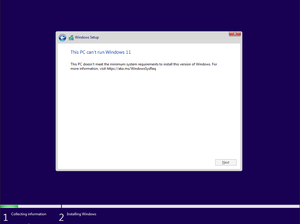
If installing any build newer than 22000.194 or 22458, make sure your VM has TPM 2.0, Secure Boot, UEFI, and at least 4 GB of RAM. Older beta builds of Windows 11 do not have these checks and these are not required.
If your VM does not have TPM 2.0, Secure Boot, or 4 or more GB of RAM, you will need to use a few registry keys to bypass these checks during the setup. When you boot into the setup, proceed until you are the license agreement. Press Shift + F10 to open Command Prompt, then type regedit. From there, go to Computer\HKEY_LOCAL_MACHINE\SYSTEM\Setup, create a new key called LabConfig, and then create the following DWORD values:
- If your VM does not have TPM 2.0, make a DWORD value called BypassTPMCheck and set the value to 1.
- If your VM does not have Secure Boot, make a DWORD value called BypassSecureBootCheck and set the value to 1.
- If your VM does not have 4 GB of RAM, make a DWORD value called BypassRAMCheck and set the value to 1.
Type exit and hit enter to exit the Command Prompt. You should now be able to proceed with the installation.
Other methods
You can use a Windows 10 image and copy the install.esd (or wim, depends) to the sources folder of the Windows 10 image. Assuming your VM already meets the Windows 10 requirements (which it should, Windows 10 can run on most computers), you can proceed with the installation as normal. Windows 11 will boot and work fine.
You can also manually deploy the image using Command Prompt. You can follow this handy guide on how to manually install Windows 11 without the graphical setup.
QEMU
Pre-installation
Make a qcow2 image (or a raw image if you want) by typing
qemu-img create -f qcow2 win11.img 60G
Windows 11 requires some disk space, you can make this 40 gigabytes if you want, but it is recommended to have at least 60 GB for users to install programs onto.
When that's done, run the following command:
qemu-system-x86_64 -hda win11.img -cdrom win11_iso_name.iso -boot d -accel kvm -cpu host -m 8G -usbdevice tablet
Or if running without root or virtualization:
qemu-system-x86_64 -hda win11.img -cdrom win11_iso_name.iso -boot d -cpu epyc -m 8G -usbdevice tablet
8 gigabytes of memory is highly recommended for optimal performance, but you can use 4 GB if absolutely necessary.
You'll also want to uninstall unnecessary applications and disable Windows Defender, so the VM won't be really slow.
During installation
It is recommended to install the Pro version, however you can install the Home version if you want. Note that you will need to sign in with a Microsoft account when you get to OOBE.
After installation
qemu-system-x86_64 -hda win11.img -cdrom win11_iso_name.iso -boot c -accel kvm -cpu host -m 8G -usbdevice tablet
Or if running without root or virtualization:
qemu-system-x86_64 -hda win11.img -cdrom win11_iso_name.iso -boot c -cpu epyc -m 8G -usbdevice tablet
Setting up your VM
After going through the OOBE, it is recommended to align the taskbar to the left as that is what many people prefer. If you are making this a UserVM, it is recommended to go through gpedit.msc and restrict some programs.
Also, if you want to make this a UserVM, it's recommended to install Google Chrome, as many people who will use your VM will most likely prefer Chrome, and will install it if it is not present.